PrettyFood

Creating memories around the table

  • Home
  • Capers
    • Hours and Location
    • Capers News
    • What’s New
    • Product Spotlight
  • Recipes
    • Visual Recipe Index
    • Appetizers
    • Breakfast
    • Desserts
    • Main Dishes
    • Salads
    • Side Dishes
    • Snacks
    • Soups
  • Advice
    • The Basics
    • Ask PrettyFood
    • Critiques
    • Essentials
    • Gadgets & Tools
  • Make it Pretty
    • Tablescapes
    • Flowers
    • Garnishes
    • Holidays & Celebrations
    • Takeout Tricks
  • On the Road
    • Chicago
    • Florence
    • Honolulu
    • Los Cabos
    • Louisville
    • Napa Valley
    • Paris
    • Santa Fe
    • Scottsdale
    • Seattle
  • Special Features
    • A Week of Low-Carb Meals
    • More from Mary Beth
  • About
    • About PrettyFood
    • Contact Us
Home / Recipes / Desserts / Chocolate Dirt Cake

Chocolate Dirt Cake

Friday, April 15, 2011

Chocolate Dirt Cake

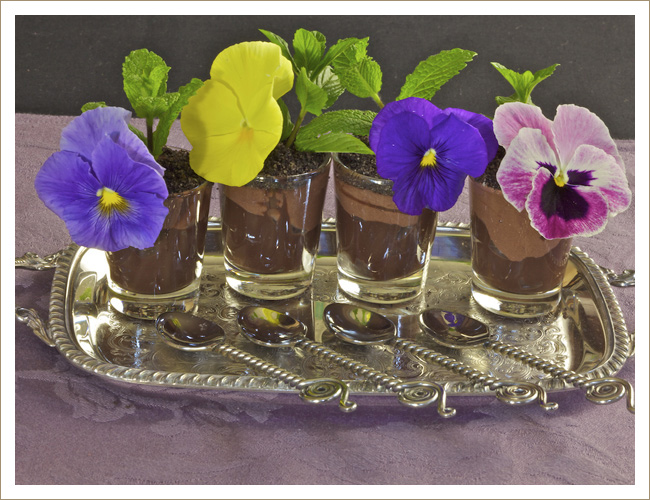
These go together in a flash, no baking required. They taste great and are (almost) too adorable to eat.

Ingredients:

  • Sugar-free Oreos
  • Pre-made individual packages of dark chocolate sugar-free pudding
  • Whipped cream, sugar-free
  • Sprigs of fresh mint
  • Edible flowers, such as pansies or nasturtiums
  • Small clear glass containers — bigger than shot glasses, but not by much

Directions:

Dirt Cake Step 1
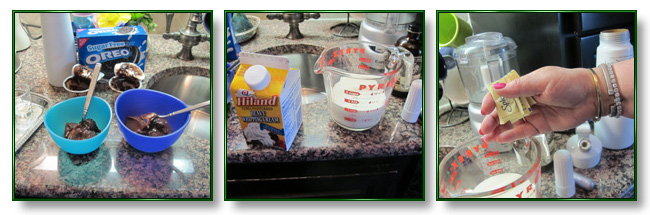
Get out a couple of small prep bowls. Put 1 container of sugar-free pudding in each. Prepare your whipping cream. To one cup heavy cream, add four packets of Splenda.

Dirt Cake Step 2
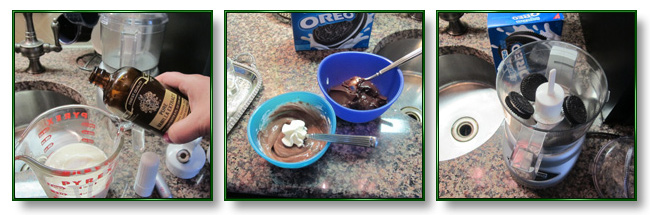
Stir the Splenda into the cream along with one capful of vanilla. Either whip by hand or use your whipped cream dispenser. (Go ahead and buy one, if you haven’t already. You won’t believe how much you will use it!) Squirt a bunch of whipped cream into one of the prep bowls of pudding and stir. You can see how much lighter the left one is after whipped cream has been added. I squirted on one more dollop to stir in because I want a noticeable contrast in color and flavor between the dark chocolate and the batch that has had the whipped cream added. Next, place four Oreos into your mini food processor. (You could, in the alternative, place them in a freezer bag and crush them.)
Dirt Cake Step 3
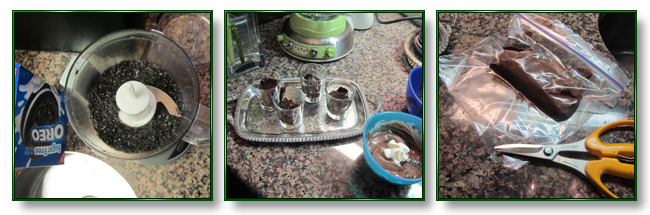
Grind the Oreos until they look like Perlite. (If you don’t know what Perlite is, you obviously haven’t spent enough time in the garden.) It should look like dirt with some tiny white balls in it. I attempted to then spoon the pudding into the small containers. I quickly learned I’m far too messy to do it that way, so I got out two baggies and spooned each pudding into a baggie, then cut a small diagonal piece off one corner of each bag.

Dirt Cake Step 4
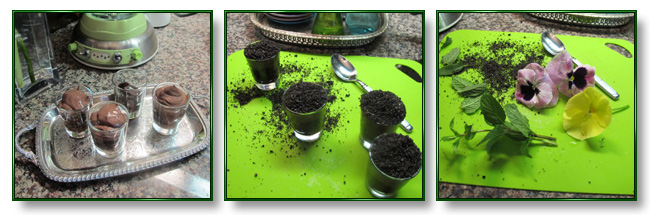
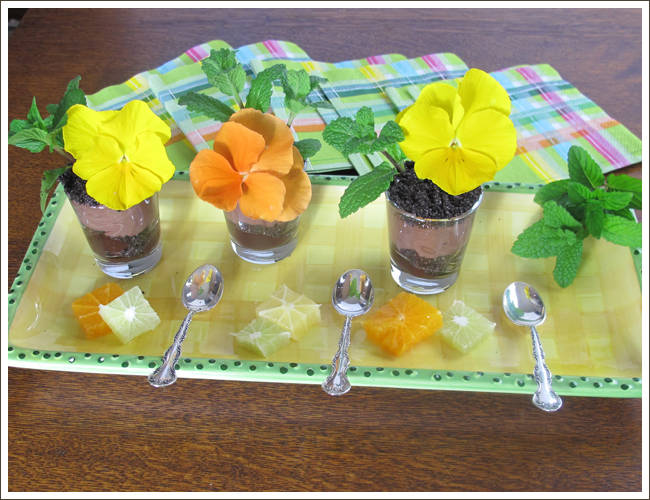
From there, it was easy to squish alternating layers in from the baggie. You want a layer of dark chocolate, a layer of lighter chocolate, a layer of Oreo “dirt.” You can make thin layers so you have two of each, or fat layers, so there is just one of each. Your call. Then, all that’s left is to “plant” the mint and flowers. Choose colors that match your tablescape or mood. Serve with small dessert spoons.

They are sooooooo cute! To make four, you’ll use 3 containers of pudding, about 1/2 cupped whipped cream and 4 Oreos. Years ago, we used to make dirt cake by making pudding, baking a chocolate cake, breaking it into chunks, getting a terra cotta flower pot and layering the cake chunks, the pudding and the Oreo dirt. This one skips the cake, uses store-bought, ready-made, sugar-free pudding, and makes individual-sized desserts that are just enough after a nice meal.

Dirt Cake

Print Friendly, PDF & Email
« Lemon Cheesecake
A Unique Fruit Slicer to Wow Your Friends »

Leave a Reply Cancel reply

Your email address will not be published. Required fields are marked *

• Our store and more •

With Capers Emporium, Mary Beth and Michael Guard have given PrettyFood.com a real home — a large retail store where people can purchase elements to set beautiful tables, concoct wonderful meals, play with gadgets, take cooking classes, and much more!. Read more »

• Hours & Location •

Now open seven days a week!

Sundays Noon – 4 p.m.
Mondays 11:00 – 5:00
Tuesdays 11:00 – 5:00
Wednesdays 11:00 – 5:00
Thursdays 11:00 – 5:00
Fridays 11:00 – 5:00
Saturdays 11:00 – 5:00

MAP »

  • Facebook
  • Twitter
  • Pinterest
  • RSS
  • Email

• Find Recipes •

Newsletter

Receive The News Bite each month.

By Course

Archives


● Farmers Market to Table
● On the Grill
● Dining Outdoors
● Time-Saving Tools
● Mary Beth's Faves

• Visual Recipe Index •

View all of Mary Beth's delicious recipes at once with our Visual Recipe Index.

• Popular •

Crudités

Preparing to Make a Recipe

Cranberry Goat Cheese Pudding Layers

• Tags •

Appetizers Asian Bacon Beef Breakfast Cheese Chicken Christmas Daily Meals December Desserts Dishes Easter Eggs Fall Farmers Market Fish Flowers Fruit Grilling Halloween Italian Low-Carb Meat Mexican Outdoors Parties party food Pasta popular Quick & Easy Seafood Seattle 2010 Snacks Southwest Spring Summer tablescape Thanksgiving Travel Turkey Vegetables Vegetarian Videos Winter
  • Home
  • Recipes
    • Visual Recipe Index
    • Appetizers
    • Breakfast
    • Desserts
    • Main Dishes
    • Salads
    • Side Dishes
    • Snacks
    • Soups
  • Advice
    • The Basics
    • Ask PrettyFood
    • Critiques
    • Essentials
    • Gadgets & Tools
  • Make it Pretty
    • Tablescapes
    • Garnishes
    • Holidays & Celebrations
    • Takeout Tricks
  • On the Road
    • Chicago
    • Florence
    • Honolulu
    • Los Cabos
    • Louisville
    • Napa Valley
    • Paris
    • Santa Fe
    • Scottsdale
    • Seattle
  • Special Features
    • A Week of Low-Carb Meals
    • More From Mary Beth
  • About

f-facebook f-twitter f-pinterest f-rss f-email
Contact Us
Site Map

Copyright © 2025 · PrettyFood | Privacy Policy